Development Setup
In this step, you will:
- Set up an IntelliJ® project with the vSDK Hello World
project - Understand how to update your POM file to connect your project to your Vault
Now that you’ve set up your Vault and executed a record trigger in the Vault UI, you can move on to writing your own custom code. To do this, let’s start with setting up your development environment.
Import the Maven Project to IntelliJ®
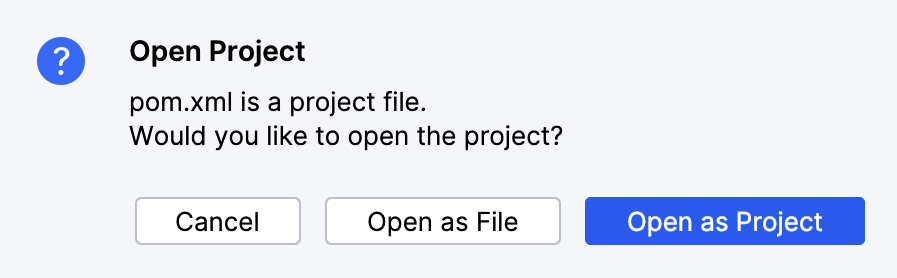
Section link for Import the Maven Project to IntelliJ®- From IntelliJ®, select File > Open.
- Navigate to your downloaded or cloned project directory and locate the pom.xml file.
- Click Open.
- In the Open Project dialog, click Open as Project. If prompted, choose Trust Project. IntelliJ® imports the project and automatically downloads the Vault Java SDK dependencies.
- Verify that the
Maven: com.veeva.vault.sdk.api:vault-sdk-apilibrary is present in the External Libraries section. If this file is not present or the External Libraries section is empty, make sure you have access to the Internet and your browser can load repo.veevavault.com. You should also make sure your POM file is set up with the correct Vault SDK version. 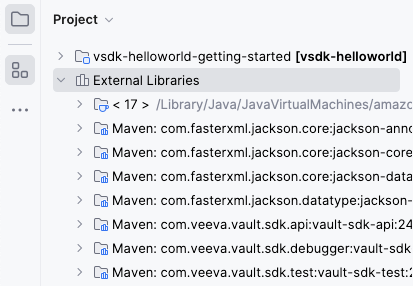
IntelliJ® Setup
Section link for IntelliJ® SetupThe Java SDK version in IntelliJ® must match the version you installed during the Prerequisites setup.
To set the Java SDK version in IntelliJ® to the required version:
- Navigate to File > Project Structure > Project Settings > Project.
- In the SDK field, select the JDK 17 that you installed.
- Click Apply and then OK.
POM Setup
Section link for POM SetupThe Java SDK library version must match the Vault version. You can update the version by editing the <vault.sdk.version> attribute in your POM file.
-
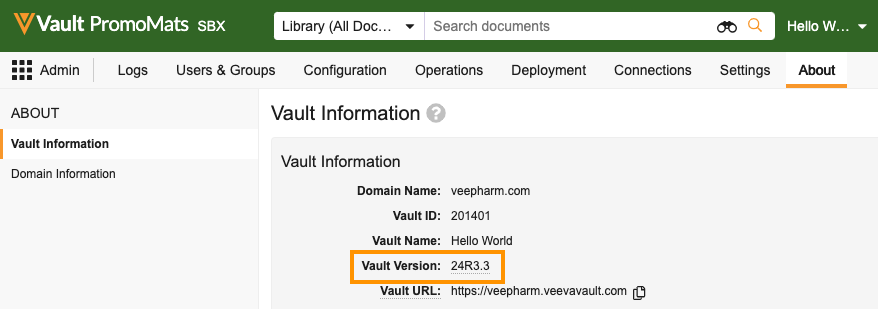
Verify the version of your Vault. You can find your Vault version in Admin > About > Vault Information.
-
In IntelliJ®, navigate to your
pom.xmlfile. -
Update the
<vault.sdk.version>to your Vault version, using only periods (.) and not the letter R. For example, a Vault on version 24R3.3 should look like this:<properties> <vault.sdk.version>[24.3.3-release0, 24.3.3-release1000000]</vault.sdk.version> </properties> -
If prompted, select Import Changes. You can also Enable Auto-Import to instruct Maven to automatically import any future changes.
In newer versions of IntelliJ®, you may need to import changes manually by right-clicking the
pom.xmlfile and selecting Maven > Reload project. -
In the External Libraries section of IntelliJ®, verify the
Maven: com.veeva.vault.sdk.api:vault-sdk-apilibrary shows your Vault version. If it does, your development setup is complete!