IntelliJ Plugin Quickstart
Learn how to set up the Vault Toolbox plugin for IntelliJ IDEA. This tutorial will then walk you through how to use Vault Toolbox to create and deploy a record trigger to Vault.
In this tutorial, you will learn how to:
- Install the Vault Toolbox IntelliJ plugin
- Create a new project
- Authenticate to Vault
- Use file and live templates to create a
RecordTrigger - Deploy the
RecordTriggerto Vault - Download the SDK Debug Log
Prerequisites
Section link for PrerequisitesTo follow this tutorial, you need:
- IntelliJ IDEA v2024.3 or higher
available from JetBrains downloaded and installed - A sandbox Vault with Vault Owner permissions, API access, and the Product (
product__v) object - A debug log session
enabled for your user account, with the Log Level scoped to ALL or DEBUG
Installing Vault Toolbox
Section link for Installing Vault ToolboxTo install the Vault Toolbox plugin:
- Download the latest version of the Vault Toolbox IntelliJ Plugin
from the JetBrains Marketplace. Alternatively, you can install it from IntelliJ IDEA by navigating to Settings > Plugins > Marketplace, searching for "Vault Toolbox", and clicking Install. - Launch IntelliJ IDEA.
- From the left sidebar, select Plugins.
- Click the gear () icon and select Install Plugin from Disk…
- Navigate to the Vault Toolbox IntelliJ Plugin
.jarfile downloaded and click Open. - Under the Installed tab, verify that the new plugin, Vault Toolbox, is enabled. If not enabled by default, enable the plugin by selecting the checkbox.

Creating a New Project
Section link for Creating a New ProjectNext, you will create a new project in IntelliJ IDEA from one of Vault Toolbox's available generators. Generators set up your project with the necessary configurations and dependencies. See the list of available generators for Vault Toolbox projects.
To create a new project:
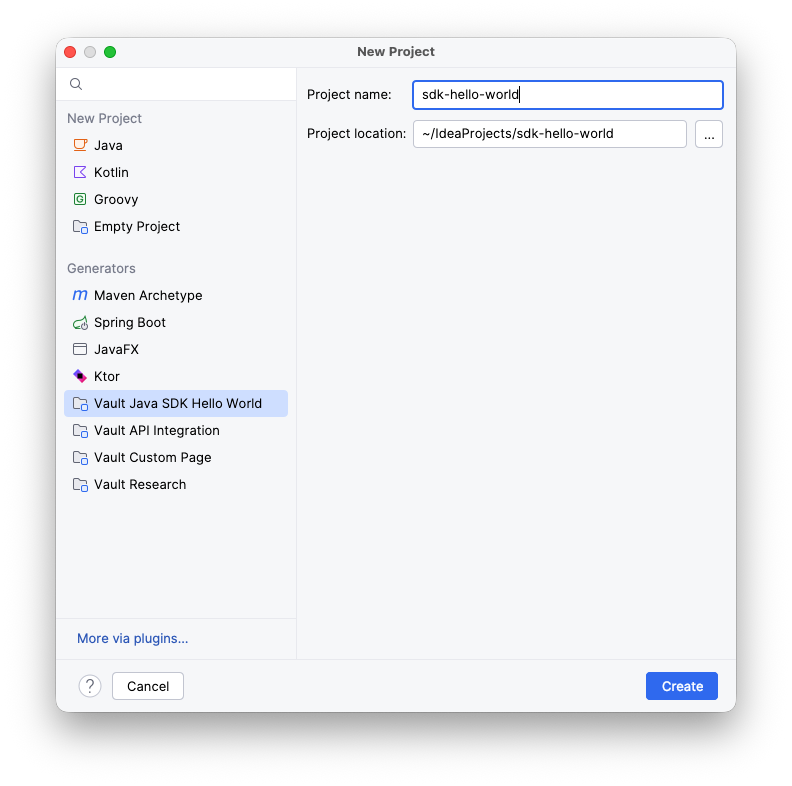
- Select Projects from the left sidebar, then select New Project.
- From the left sidebar of the dialog, underneath Generators, select Vault Java SDK Hello World.
- Populate the Project name with "sdk-hello-world" and confirm the Project location.
- Click Create.
Your Vault Java SDK Hello World project is now available with Vault Toolbox tools already configured.
Authenticating to Vault
Section link for Authenticating to VaultPrior to using Vault Toolbox's tools, you must authenticate to Vault.
To authenticate using basic login:
- In IntelliJ IDEA, open the Vault Toolbox plugin from the righthand sidebar.
- Select the
tab. - For this Quickstart, select the Basic tab. See Authenticating to Vault to learn more about the available authentication methods.
- Enter your Vault DNS, Username, and Password. Alternatively, click
to load a saved credential. 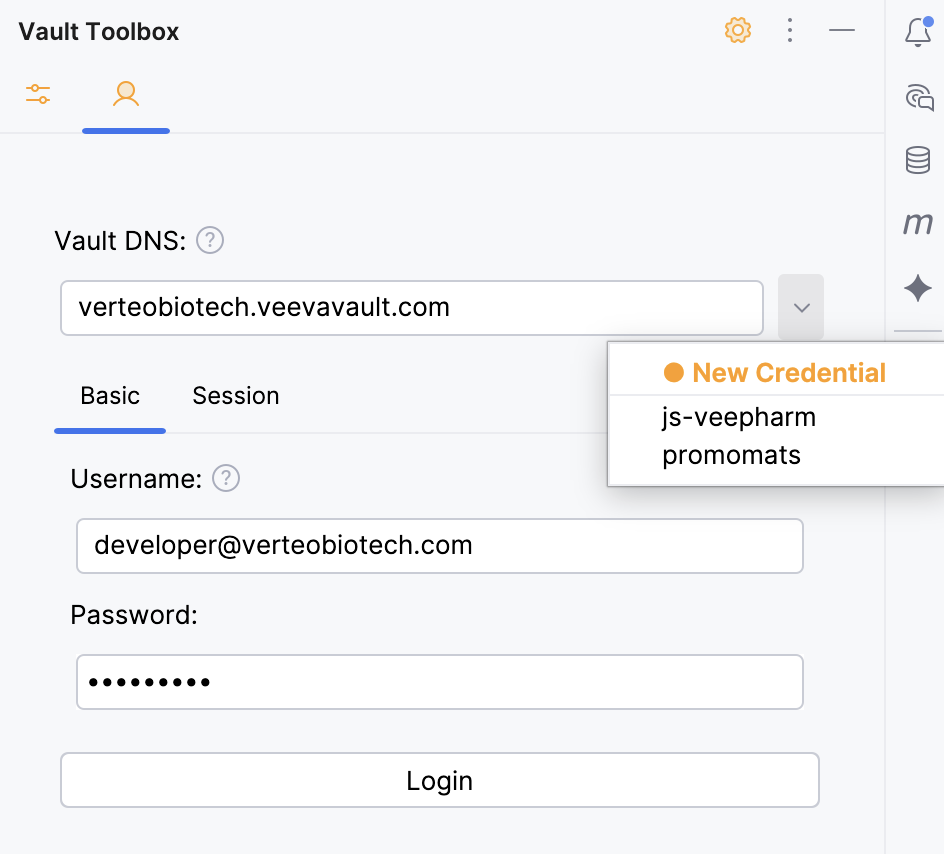

- Click Login. At the bottom of the panel, Vault Toolbox prompts you to save these credentials.
- Optional: Click Yes to save these credentials. Provide a Credential label and click Save.
You've now successfully authenticated to Vault.
Creating a Record Trigger
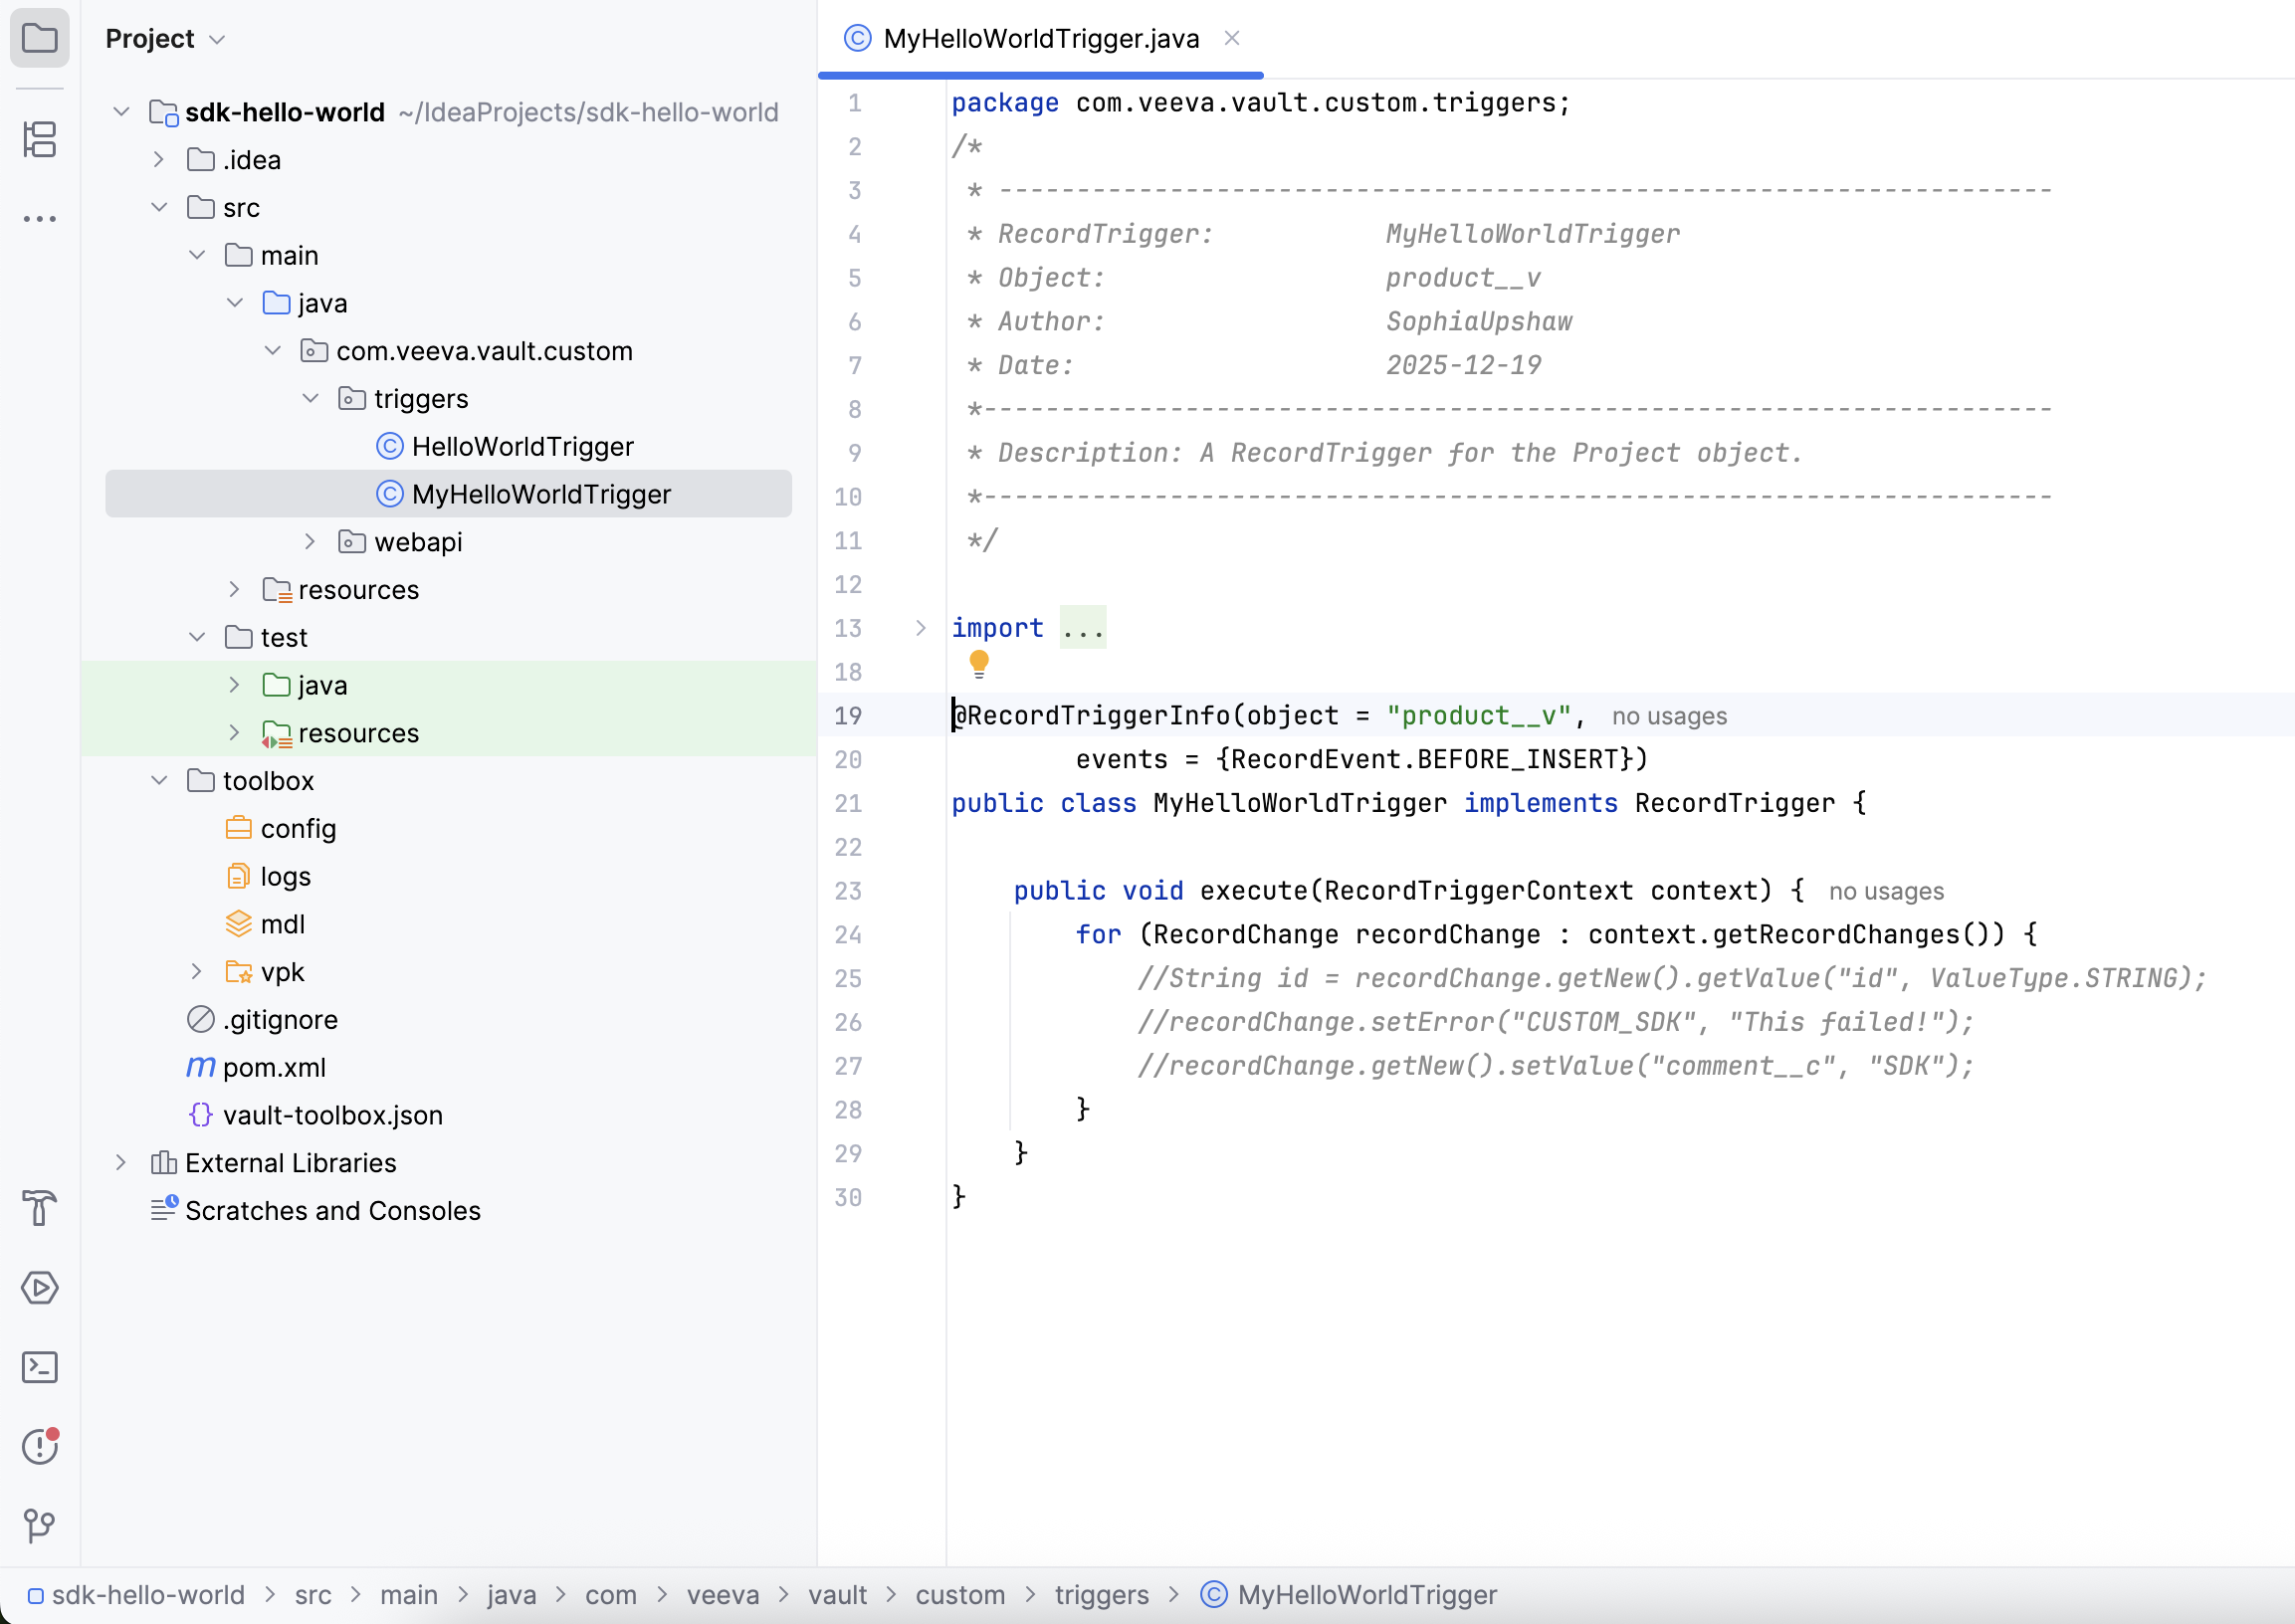
Section link for Creating a Record TriggerThe following sections guide you through creating a RecordTrigger named MyHelloWorld from a file template, then customizing it with a live template.
The MyHelloWorld record trigger executes at the BEFORE_INSERT event on the product__v object. This means the trigger will execute custom code right before an object record is saved, and that this trigger only executes on product__v object records. When triggered, the custom code written for the MyHelloWorld trigger will send a DEBUG type message to your Vault's Debug Log.
Using File Templates
Section link for Using File TemplatesVault Toolbox includes file templates for all Vault Platform SDK entry points that specify the default contents for new files you create within your project.
To create a RecordTrigger from a file template:
- Right-click the src/main/java/com/veeva/vault/custom/triggers folder within your sdk-hello-world project.
- Hover over New, and select the Vault Java SDK RecordTrigger file template.
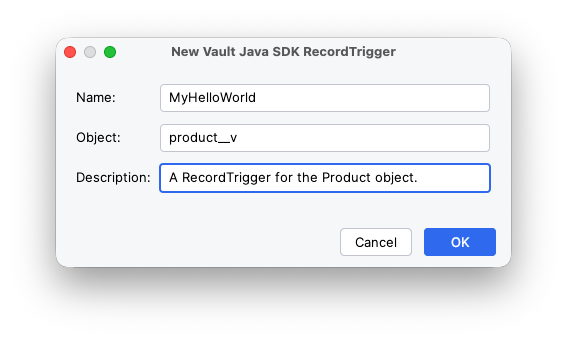
- In the dialog, populate the fields with the following values:
- Name: MyHelloWorld
- Object: product__v
- Description: A RecordTrigger for the Product object.
- Click OK.
Within the triggers folder, this action creates a file named MyHelloWorldTrigger.java. The new file includes the initial formatting necessary for a RecordTrigger, pre-populated with values from the fields prompted for previously. As shown in the screenshot below, if you provide product__v as the Object, the class is defined with object = "product__v".
Using Live Templates
Section link for Using Live TemplatesVault Toolbox includes live templates for creating snippets of Vault Java SDK code within an entry point.
To customize your RecordTrigger with live templates:
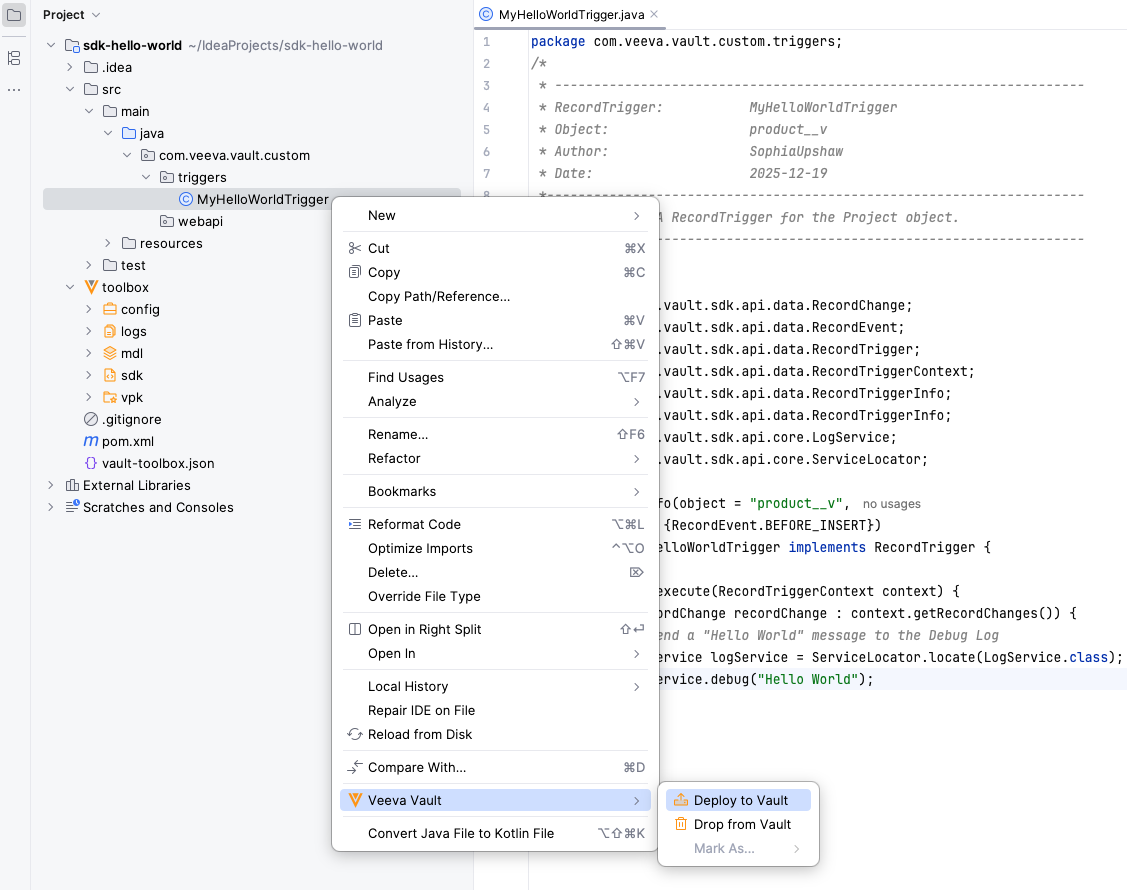
- Add the following import statements:
import com.veeva.vault.sdk.api.core.LogService; import com.veeva.vault.sdk.api.core.ServiceLocator; - Within the
MyHelloWorldTrigger.javafile, remove the auto-generated comments inside theforloop in theexecute()method (lines 25-27). - Next, we will replace this logic with our own custom logic using a live template. Inside the
forloop in theexecute()method, begin manually typingsdk_debug_logand select it in the dropdown that appears. A code snippet appears, utilizing theLogServiceinterface to send a message to the Debug Log. - Insert the text "Hello World" into the
debug()method, as shown below.LogService logService = ServiceLocator.locate(LogService.class); logService.debug("Hello World"); - Save your
MyHelloWorldTrigger.javafile.
Next, you will deploy your MyHelloWorld trigger to your Vault.
Deploying to Vault
Section link for Deploying to VaultTo test your MyHelloWorld trigger, you must first deploy it to your Vault. While Vault Toolbox includes tools to assist with designing, building, and deploying custom configuration migration packages, this quickstart will utilize a user action to simplify the process.
To deploy your MyHelloWorld trigger to Vault, right-click on the MyHelloWorldTrigger.java file in your project directory and select Veeva Vault > Deploy to Vault (
Downloading the Debug Log
Section link for Downloading the Debug LogThe SDK Debug Log contains the execution details and Vault messages for custom Vault Java SDK code at the user level. The deployed MyHelloWorld record trigger executes right before a Product (product__v) object record is saved, sending the DEBUG type message, "Hello World", to your Vault's Debug Log.
A Vault Admin must already have configured a Debug log session for your user via the Vault UI
- After creating a Product record via the Vault UI, navigate back to IntelliJ IDEA.
- Within IntelliJ IDEA, open the Vault Toolbox plugin from the righthand sidebar.
- Select the
tab. - Expand Developer Logs (
) and double-click SDK Debug ( ). 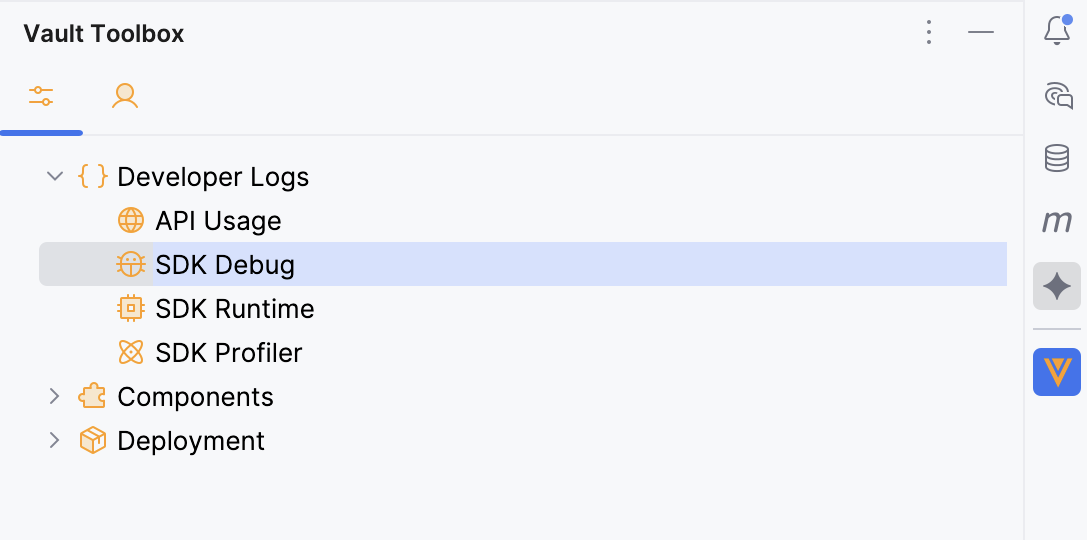
- In the dialog, select the debug log session for your user account. If the list is empty, a Vault Admin should create a new debug log session using the Vault Toolbox plugin.
- Click
to download the selected log. - In the dialog, previously downloaded logs are differentiated by a
within the View column. To proceed with analyzing the debug log, select the checkbox for the downloaded log, then click . The CSV file of the analysis will then open in your preferred spreadsheet application.
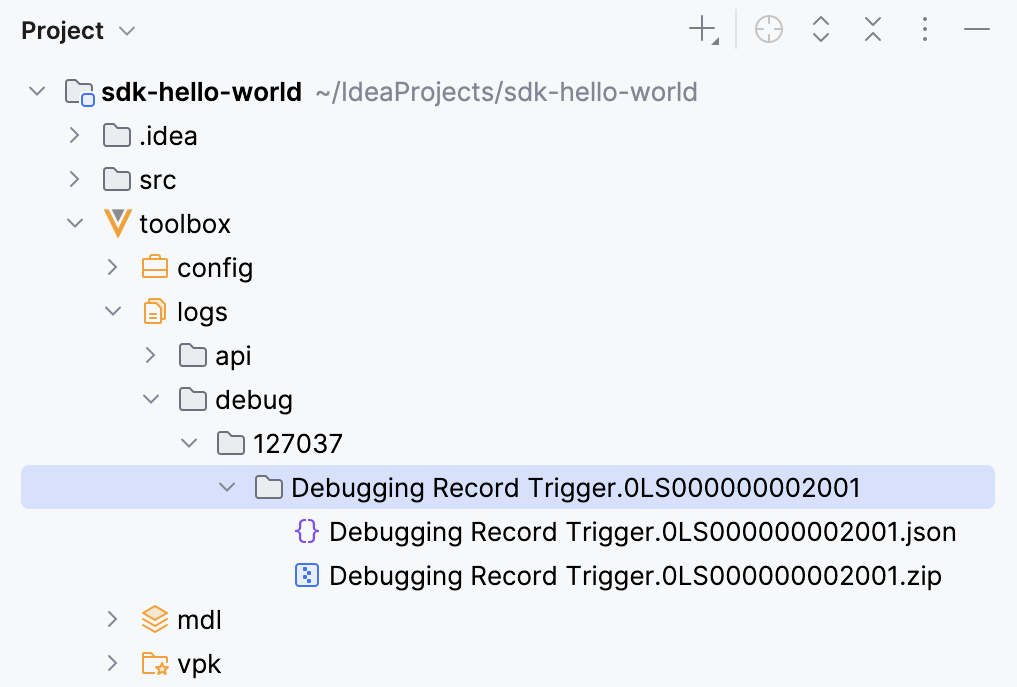
Once the operation is complete, you can access the downloaded SDK Debug Log .zip file from the toolbox/logs/debug/{vaultid} folder and the analysis files from toolbox/logs/debug/{vaultid}/debug_analysis in your project directory. Open the CSV, locate the row with a type of DEBUG, and verify that the message column reads Hello World.
Congratulations! You've successfully set up the Vault Toolbox plugin for IntelliJ IDEA and used its functionality to create custom SDK code, deploy it to Vault, and download the Debug Log.