Using Vault Toolbox to Execute MDL
MDL commands can be executed with any tool capable of making API calls, including Vault Toolbox. With Vault Toolbox, you can easily make configuration changes without needing to perform additional steps to authenticate and make API calls. Learn more about the Vault Toolbox browser extension.
About Picklist Order
Section link for About Picklist OrderYou can change the way a Picklist component orders Picklistentry label values by using the ALTER command to modify the order_type attribute to one of the following values:
order_asc__sys(default): Values are displayed in the order defined by their order attribute.value_label_asc__sys: Values are displayed in ascending (a-z) alphabetical order based on the user's language or label sets.value_label_desc__sys: Values are displayed in descending (z-a) alphabetical order based on the user's language or label sets.
ALTER Picklist study_ownership__c (
   order_type('value_label_desc__sys')
);
Reordering Picklist Values
Section link for Reordering Picklist ValuesTo configure a picklist to display picklist entries in a specific order, you must first set the parent Picklist component's order_type attribute to order_asc__sys. Next, use the ALTER command to MODIFY the order() attribute of the Picklistentry sub-component. Learn more about the ALTER command.
ALTER Picklist study_ownership__c (
    MODIFY Picklistentry first_item__c ( order(0) ),
    MODIFY Picklistentry second_item__c ( order(1) ),
    MODIFY Picklistentry third_item__c ( order(2) )
);
Vault ignores the value of the order attribute and instead sorts alphabetically when the parent Picklist component's order_type attribute is set to value_label_asc__sys or value_label_desc__sys.
Understanding Picklist Order
Section link for Understanding Picklist OrderPicklist order always starts at position 0, which is the first position in the order. Order values after 0 follow sequentially.
If the user enters any non-sequential or duplicate order values, Vault reorders the picklist order values into a sequential order. Duplicate orders are reordered into the order they were configured.
For example, if the user submits the following ALTER command:
ALTER Picklist study_ownership__c (
    MODIFY Picklistentry first_item__c ( order(1) ),
    MODIFY Picklistentry second_item__c ( order(8) ),
    MODIFY Picklistentry third_item__c ( order(8) ),
    MODIFY Picklistentry fourth_item__c ( order(30) ),
);
Vault reorders these picklist entries to the following order values:
RECREATE Picklist study_ownership__c (
    MODIFY Picklistentry first_item__c ( order(0) ),
    MODIFY Picklistentry second_item__c ( order(1) ),
    MODIFY Picklistentry third_item__c ( order(2) ),
    MODIFY Picklistentry fourth_item__c ( order(3) ),
);
Constructing the MDL Command Using a Vault Configuration Report
Section link for Constructing the MDL Command Using a Vault Configuration ReportInstead of manually constructing MODIFY commands for each Picklistentry, you can leverage a Vault Configuration Report to retrieve all the values in a picklist and then customize the order. Learn more about generating Vault Configuration Reports
When exporting a Vault Configuration Report, you only need to include the Picklist component in the Component Types section. Once exported, navigate to the Picklist.Picklistentry tab within the Excel file, and filter the Picklist Name column for the picklist you want to modify.

Next, copy and paste those values into a new sheet where you can reorder them.
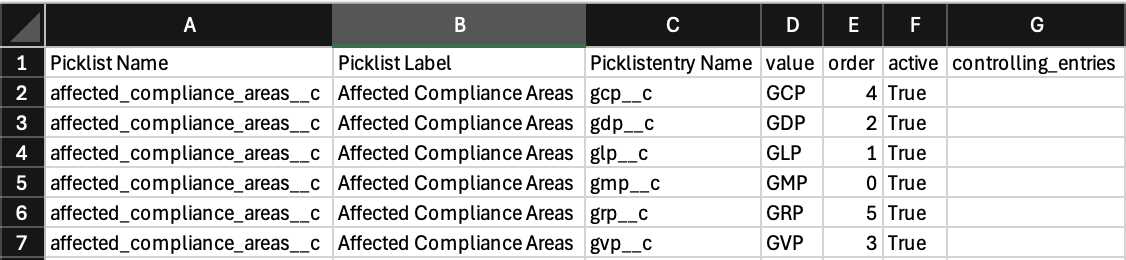
In a new column, add a formula that will construct the MODIFY commands to change the order() attribute of the Picklistentry sub-components.
The following formula assumes that the Picklistentry Name column is "C" and the first picklist entry value is in row 2:
="MODIFY Picklistentry "&C2&" ( order("&ROW(C2)-2&") )"Expand the formula to all rows, and it should look like this:

Next, add a formula to an empty cell to construct the complete ALTER command.
The following formula assumes that the Picklist Name is in cell "A2" and the range of the MODIFY column is "H2:H7":
="ALTER Picklist "&A2&" ( "&TEXTJOIN(", ",TRUE,H2:H7)&" );"The formula above generates the complete MDL command, which you can then copy from column H and paste into Vault Toolbox's Component Editor. The formula above may not function as expected depending on your Excel regional format settings. For example, you may need to replace the commas within the TEXTJOIN function with semicolons if you reside in the EU.
Executing the MDL Command with Vault Toolbox
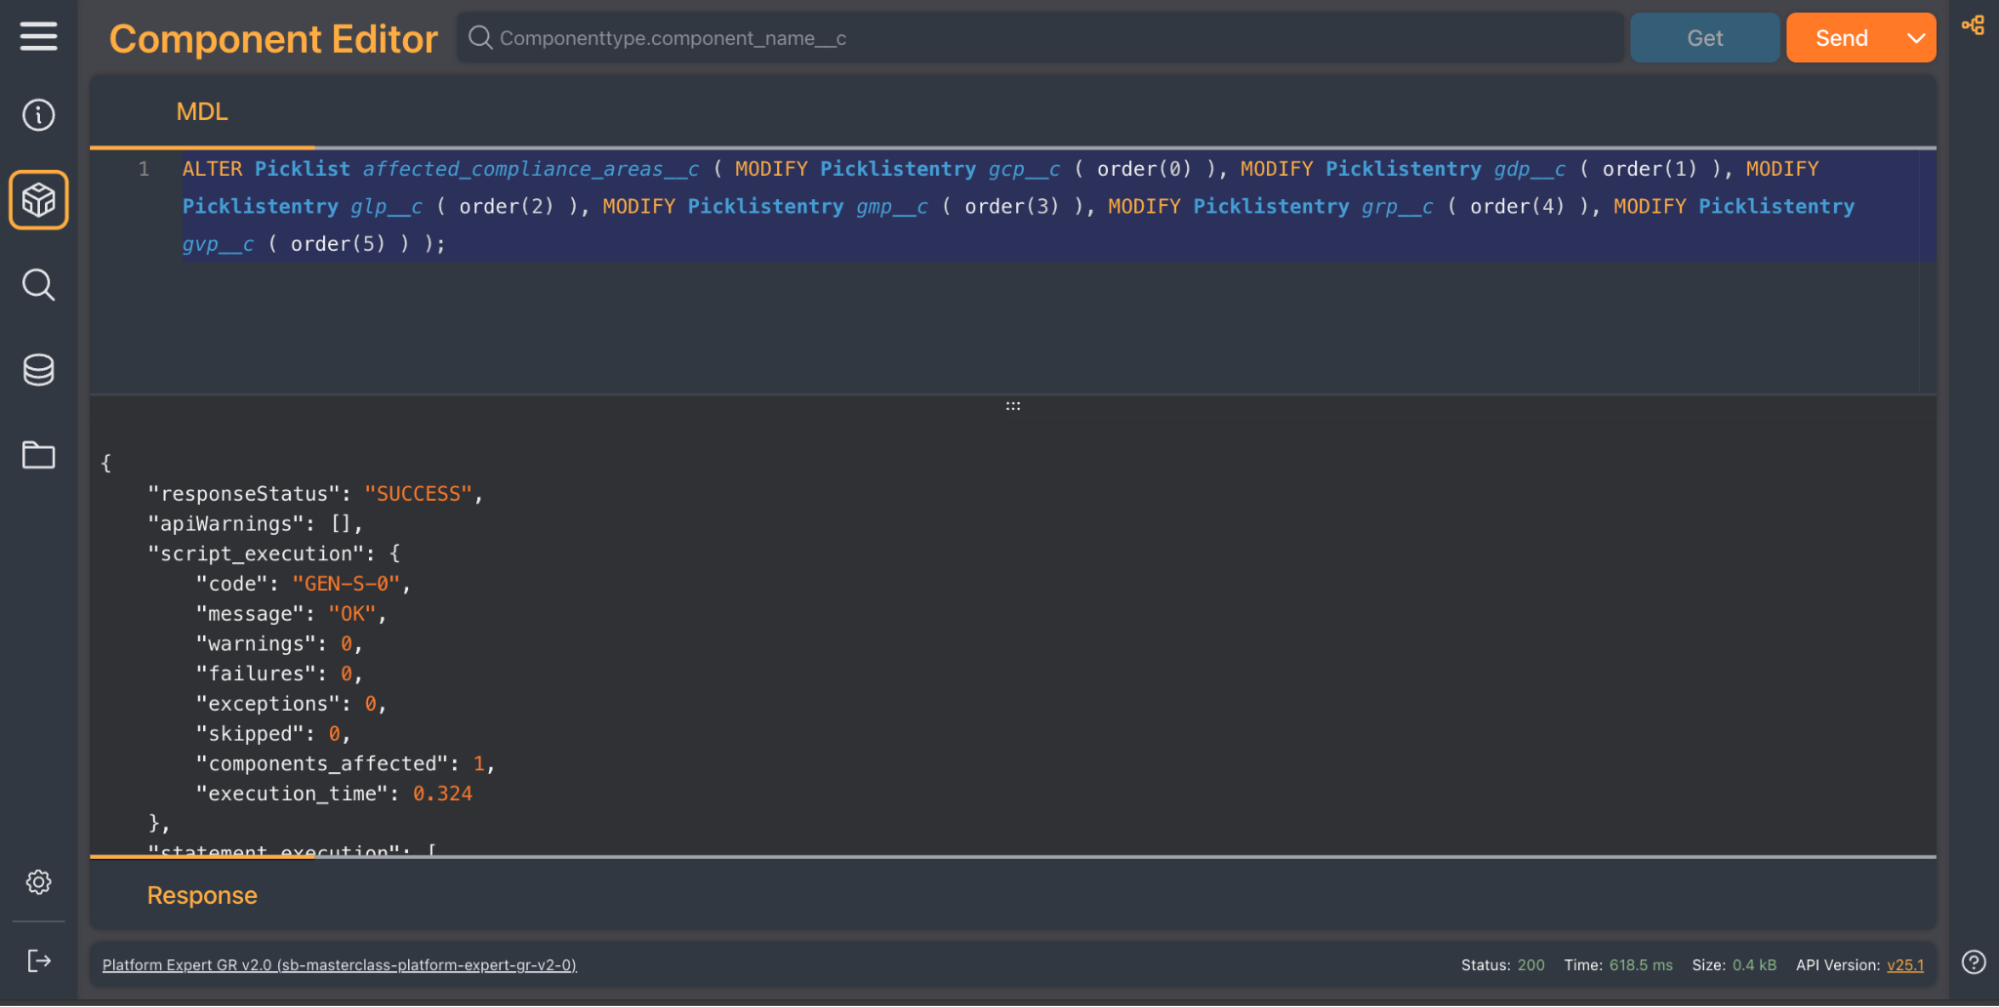
Section link for Executing the MDL Command with Vault ToolboxTo execute the MDL command using Vault Toolbox, log in to Vault and then launch Vault Toolbox from your browser. You can use Integrated Login to authenticate with your active session. Learn more about integrated login for Vault Toolbox.
Navigate to the Component Editor, paste the MDL command generated in the previous section, then click Send. This will execute the command in your Vault.
If this change has been executed in a sandbox environment, you must use migration packages to replicate configuration changes in your production environment. Learn more about using configuration migration packages
Deploying the Changes to Production
Section link for Deploying the Changes to ProductionIn your sandbox Vault:
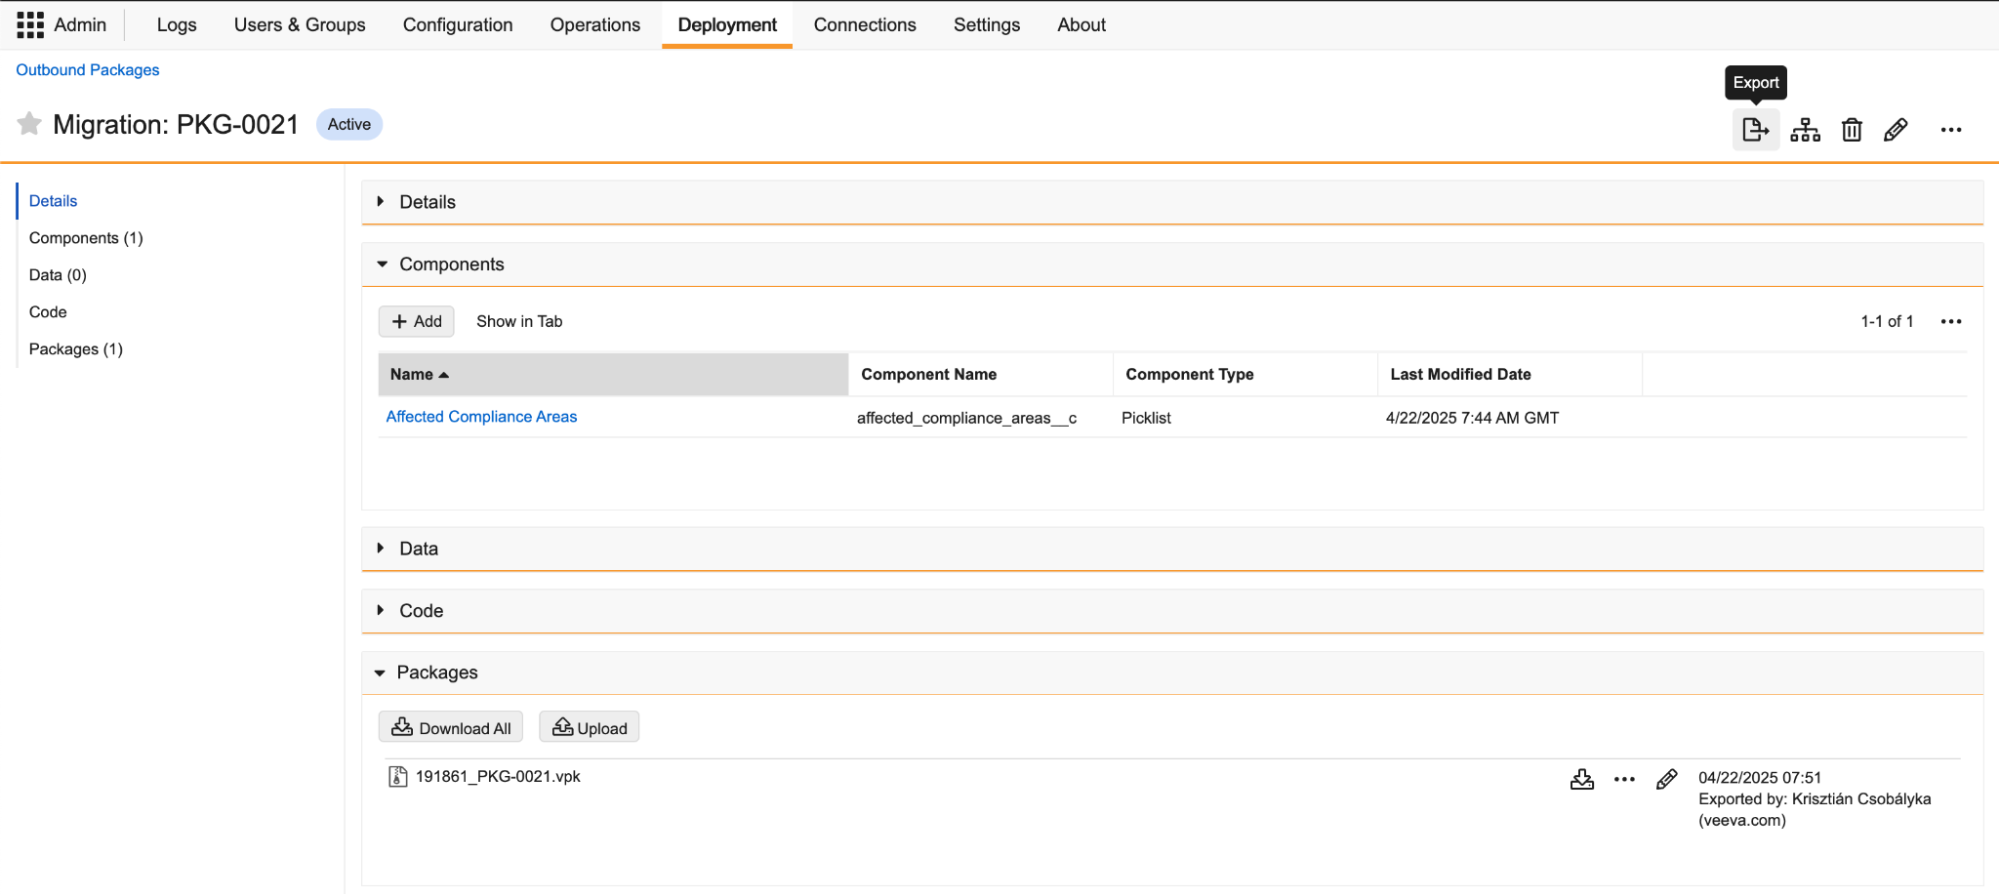
- Navigate to Admin > Deployment > Outbound Packages and create a new outbound package.
- Add the
Picklistcomponent you modified previously to the Components section. - Click Export to generate the VPK.
- Download the VPK from the Packages section.
In your production Vault:
- Navigate to Admin > Deployment > Inbound Packages and import the VPK that was exported from your sandbox environment.
- From the Actions menu of the inbound package, click Review & Deploy to deploy the reordered picklist values to production.
- Navigate to Business Admin > Picklists to verify the new order of picklist values.
Creating Picklist Dependencies
Section link for Creating Picklist DependenciesPicklist dependencies rely upon a controlling field to determine which values are available for selection in a dependent picklist field. To create or edit picklist dependencies, use the ALTER command to MODIFY the attributes of the Object.Field sub-component. Learn more about managing dependent picklists
While picklist dependencies and their controlling field values are represented by a matrix in the UI, their values in MDL are represented as follows:
controlling_picklist('field_name')- defines which Yes/No (Boolean) or picklist field is the controlling fieldpicklist_dependencies('{"controlling_value":["available_value"]}')- defines a list of controlling field values, followed by an array of available dependent picklist values in JSON format
For example, if there is a field called Region (region__c) and we want to control the available Language (language__c) values, then Region will be the controlling field and Language will be the dependent picklist field.
To set up the "matrix" of languages available in each region, you must execute an ALTER command on the object and its field, defining the region__c as the controlling_picklist, and then defining a JSON list of picklist_dependencies. Use the API names of the Picklistentry subcomponents when creating the JSON list. If the controlling field is a Boolean field, use true and false as the controlling values.
The following ALTER command modifies the picklist dependencies for the language__c picklist field on the product__v object:
ALTER Object product__v (
    MODIFY Field language__c (
controlling_picklist('region__c'),
picklist_dependencies('{"emea__c":["english__c"],"apac__c":["chinese__c","japanese__c"]}')
    )
);
Executing the MDL Command with Vault Toolbox (Dependencies)
Section link for Executing the MDL Command with Vault Toolbox (Dependencies)To execute the MDL command using Vault Toolbox, log in to Vault and then launch Vault Toolbox from your browser. You can use Integrated Login to authenticate with your active session.Learn more about integrated login for Vault Toolbox.
Navigate to the Component Editor, paste the MDL command generated in the previous section, then click Send. This will execute the command in your Vault.
If this change has been executed in a sandbox environment, you must use migration packages to replicate configuration changes in your production environment. Learn more about using configuration migration packages
Deploying the Changes to Production (Dependencies)
Section link for Deploying the Changes to Production (Dependencies)In your sandbox Vault:
- Navigate to Admin > Deployment > Outbound Packages and create a new outbound package.
- Add the
Objectcomponent you modified previously to the Components section. - Click Export to generate the VPK.
- Download the VPK from the Packages section.
In your production Vault:
- Navigate to Admin > Deployment > Inbound Packages and import the VPK that was exported from your sandbox environment.
- From the Actions menu of the inbound package, click Review & Deploy to deploy the reordered picklist values to production.
- Navigate to Admin > Configuration > Objects > [Object Name], select the dependent picklist field from the Fields tab, and click View Dependencies to verify the new picklist dependencies.