About Configuration Migration Packages
Configuration migration packages (VPKs) allow you to migrate configuration changes and test data between two Vaults. Migration packages are particularly useful when your organization needs to configure and test in a sandbox Vault, and then move those configurations into a production Vault. Using VPKs to migrate configuration helps eliminate the need for manual steps, decreasing the likelihood of human error. You can utilize VPKs generated by Vault or create your own custom VPKs.
This article explains the difference between Vault-generated and custom VPKs, as well as how to interpret the contents of VPKs. Learn how to create and deploy custom configuration migration packages.
Vault-Generated VPKs
Section link for Vault-Generated VPKsVPKs generated in the Vault UI directly from Admin > Deployment or using Vault Compare
There are two types of Vault-generated VPKs:
Custom VPKs
Section link for Custom VPKsWith the growing complexity of Vaults, there is an increased need to modify Vault-generated VPKs or to create custom VPKs that use DROP, RENAME, and ALTER commands (instead of RECREATE). These custom VPKs are built to perform a specific set of changes without overriding other configuration you want to keep in the target system.
Learn how to create and deploy custom configuration migration packages.
VPK Contents
Section link for VPK ContentsAfter you have successfully unzipped a VPK, you will have access to its contents. There are three items at the top level of the folder structure:
- vaultpackage.xml: The manifest file that describes the VPKs attributes
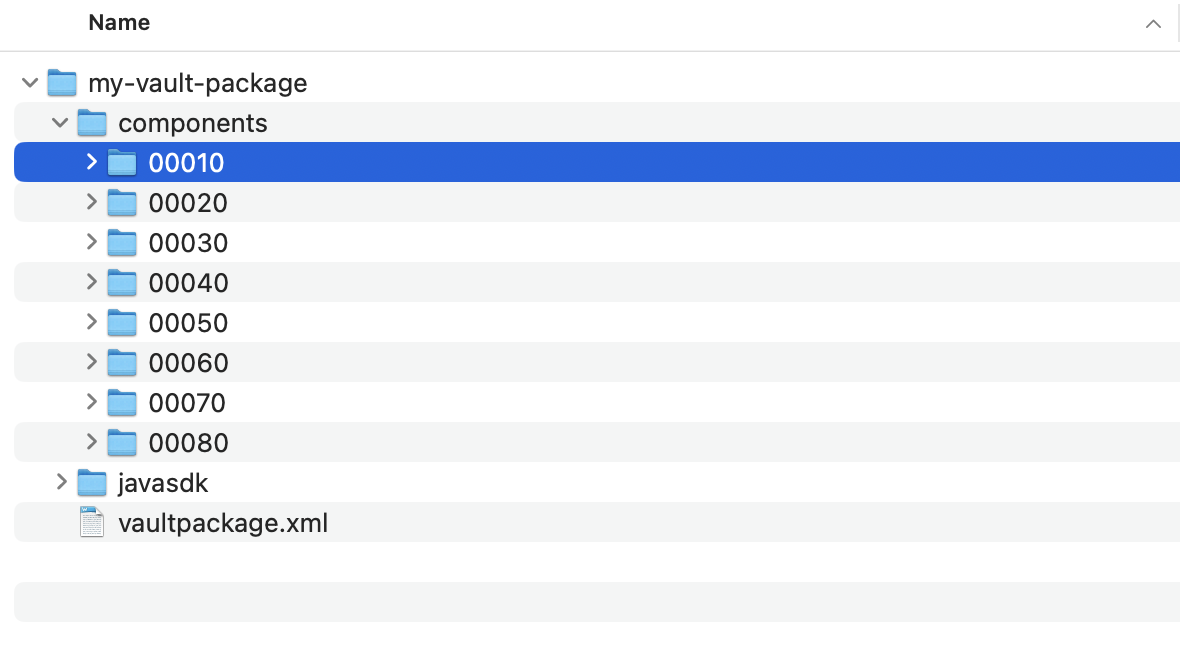
- components: The folder containing all the deployment steps as numbered folders
- javasdk: This folder is only present if you are deploying Vault Java SDK code with the VPK.
VPK Manifest File
Section link for VPK Manifest FileThe VPK manifest file (vaultpackage.xml) contains information about the VPK that Vault interprets when importing the package.
The manifest file contains the following nodes in XML format:
- <name>: The name of the VPK as it will appear after importing on the Admin > Deployment > Inbound Packages page
- <source>: Contains information about where the package originated
- <vault>: The Vault ID of the source Vault
- <author>: The user creating the VPK
- <packagetype>: Indicates whether this is a migration (
migration__v)or test data ( test_data__v)package - <summary>: A short description of the VPK to quickly identify its purpose
- <description>: A detailed description of the VPK, its contents, or any additional deployment instructions
- <javasdk>: Required when deploying Java SDK Code to Vault
- <deployment_option>: Specifies which deployment option should be used by the VPK at import
Components Folder
Section link for Components FolderEach folder within the components folder represents a single deployment step. There are two types of steps in every VPK: a component step and a data step.
The order of the steps is determined by the name of the folder, which is a number in 000000 format. For example, step number 10 would be 000010. This allows you to rename folders to change their deployment order or to insert steps between them. Each deployment step must be in a separate folder.
By default, Vault scales up the step numbers to maintain relative order, but allows you to add steps in between without having to rename all folders. For example, between steps 000010 and 000020, you can insert step 000015 without having to rename any of the folders to keep the relative order.
Component Step
Section link for Component StepA component step is used to perform an MDL command. In the case of VPKs exported from the Deployment tab in the Vault Admin UI, the component steps will always be generated as RECREATE commands.
When preparing for deployment, you may wish to use DROP, RENAME, and ALTER commands instead of RECREATE. Component steps consist of three different text files with specific extensions, which we’ll explain in the following sections. All of the files can be opened in a text editor such as Notepad, Notepad++, or Sublime Text.
Metadata Definition Language (MDL) Command File (.mdl)
Section link for Metadata Definition Language (MDL) Command File (.mdl)The component_type.component_name.mdl file contains the MDL command to be executed. If this VPK was generated by Vault, these will always be RECREATE commands. We recommend creating a separate step for each MDL command.
You can use other MDL commands if you need to perform operations that are more precise than the RECREATE commands in the Vault-generated VPK:
DROPcommands create a step that will delete a component.RENAMEcommands allow you to change the API name of a component.ALTERcommands can be used for attribute or subcomponent-level changes, applying them without completely replacing the existing configuration.
To create a new MDL file, create a new file in your text editor, add an MDL command to it, then change the name and file extension of the .txt file to the following format: {component_type}.{component_name}.mdl. For example, Picklist.category__c.mdl.
Example MDL file contents:
ALTER Picklist category__c (
   ADD Picklistentry new_category__c(
      value('New Category'),
      order(10),
      active(true)
   )
);
MD5 Checksum File (.md5)
Section link for MD5 Checksum File (.md5)The component_type.component_name.md5 file contains the MD5 checksum.mdl file, which is a long string of characters that helps uniquely identify the contents of the VPK. Its purpose is to ensure the MDL commands are not corrupted during import. This file is automatically created for Vault-generated VPKs and must be present at import.
If you add a new step or make changes to the .mdl files of any existing step, you must generate a new MD5 checksum for the .mdl file.
You can generate the MD5 checksum for the .mdl file using multiple methods. The following examples show how to create the MD5 checksum from the command line. Alternatively, you can modify an existing MD5 file.
Generate MD5
Section link for Generate MD5-
From the Terminal, navigate to the folder where the
.mdlfile is and use the following command to change directories: -
Type the following command then press Enter:
-
Copy the MD5 hash displayed on the screen.
Create the .md5 file
Section link for Create the .md5 fileTo create a new MD5 file, create a new file in your text editor, add an MD5 hash to it, then change the name and file extension of the .txt file to the following format: {component_type}.{component_name}.md5. For example, Picklist.category__c.md5.
54baca9cf605ab0917a072ee0bf7b940 Picklist.category__cModify the .md5 File
Section link for Modify the .md5 FileIf you have modified an existing component step, you must replace the MD5 hash with the current one you generated in the existing .md5 file.
54baca9cf605ab0917a072ee0bf7b940 Picklist.category__cDependency File
Section link for Dependency FileThe component_type.component_name.dep CSV file contains all the dependencies at the time of export from the source Vault. Certain configuration requires the existence of other, referenced configuration, and these dependencies are described in the .dep file. Vault then uses this file when validating a VPK to determine if the necessary dependencies exist either in the VPK or in the target Vault.
The dependency file contains the following column headers:
- In Package
- Blocking Type
- Source Component Label
- Source Component Name
- Source Component Type
- Target Component Label
- Target Component Name
- Target Component Type
- Target Sub Component Name
- Target Sub Component Type
To create the .dep file from the Vault Component Relationships (vault_component_relationships__sys) system object, use the following Vault component relationships query, then prepend a column named “In Package” to indicate if the dependency is in the VPK (true) or not in the VPK (false).
SELECT
    blocking__sys,
    comp_rel_source_comp__sysr.label__v,
    comp_rel_source_comp__sysr.component_name__v,
    comp_rel_source_comp__sysr.component_type__v,
    comp_rel_target_comp__sysr.label__v,
    target_component_name__sys,
    target_component_type__sys,
    target_sub_name__sys,
    target_sub_type__sys
FROM
    vault_component_relationship__sys
WHERE
    comp_rel_source_comp__sysr.component_name__v = 'user__sys'
If the dependency is not in the VPK (false), Vault must confirm that the component is in the target Vault. If the Blocking Type is block__sys, Vault prevents the deployment of the VPK.
Data Step
Section link for Data StepData steps are used to deploy data into the system using CSV files via Vault Loader. This means that any Load action performed via Vault Loader can instead be done via data steps in your VPK.
Each data step must contain only one .csv file and one .xml file, even if there are multiple objects selected when creating the dataset for your VPK in the Deployment tab in the Vault Admin UI.
Dataset Manifest File (.xml)
Section link for Dataset Manifest File (.xml)The dataset manifest file contains the following nodes in XML format:
- <label>: The label of the data step, which consists of the Dataset ID (for example,
DSET-00004) and the Object Label (for example,Country) combined with a hyphen. - <steprequired>: If
true, indicates that the step is required. - <checksum>: The MD5 Checksum of the
.csvfile containing the object records. - <datastepheader>: Contains the information required to initiate a Vault Loader job:
- <object>: The API name of the object for which data is being processed.
- <idparam>: Used to identify object records by any unique field value. Can only be used when
actionisUpsert,Update, orDelete. You can use any object field that hasuniqueset totruein the object metadata. - <datatype>: The type of data for the step. At this time, the value is always
Object. - <action>: Describes the action being performed by the loader job:
Create,Update,Upsert, orDelete. - <recordmigrationmode>: If set to
true, initiates the Vault Loader job in Record Migration Mode. - <recordcount>: The number of records in the CSV file.
Vault Loader File (.csv)
Section link for Vault Loader File (.csv)The .csv file for a data step contains the object record metadata. This is the same file that users would normally use with Vault Loader.
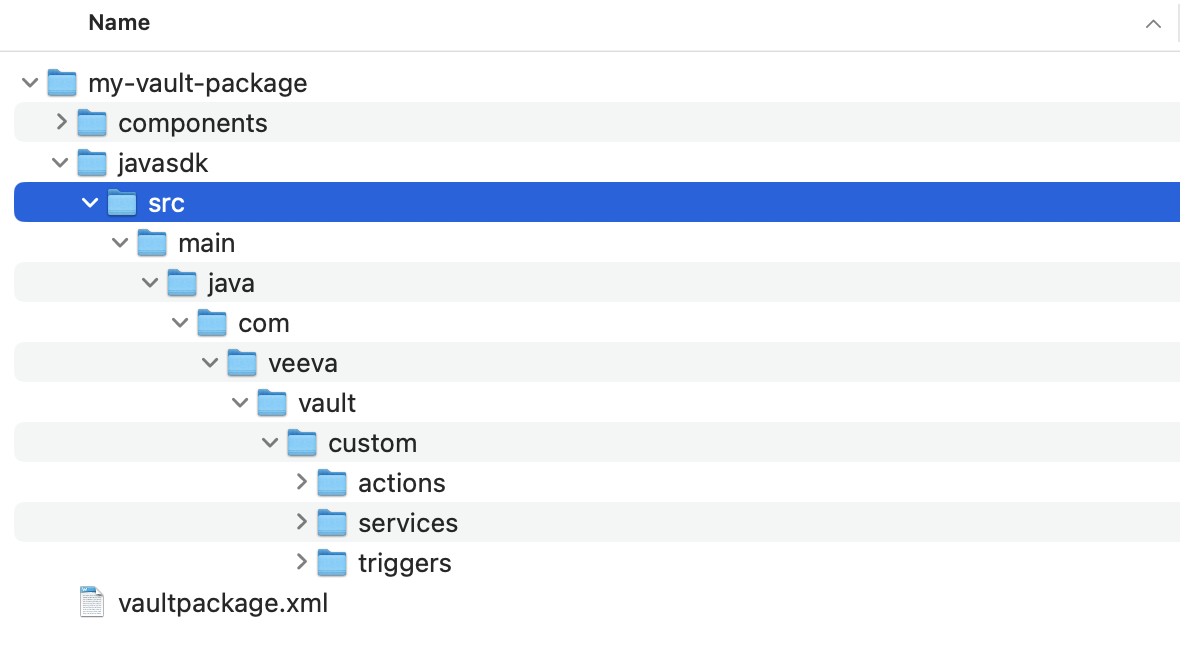
Vault Java SDK Folder
Section link for Vault Java SDK FolderVault Java SDK code will always be deployed after all the steps, and does not require a deployment step folder to be created in the components folder. Instead, you must add the src folder of your Vault Java SDK project to the javasdk folder in the root of the VPK.