Migration Best Practices
This article identifies the common practices that should be considered when migrating documents, objects, or configuration into Vault.
Extracting Data
Section link for Extracting DataSource data for a migration can come from legacy applications, file shares, spreadsheets, or even an existing Vault. The details of extracting data from its source format will depend on the system itself. Customers who are migrating from a complex source application often choose to work with a Certified Migration Partner
Batch and Delta Runs
Section link for Batch and Delta RunsA key consideration for data extraction is minimizing downtime during the cutover from the legacy application to Vault. Often the cutover is done over a weekend. To support this, it is recommended to migrate the majority of data or documents in batches beforehand while the legacy system is still running and then only do a delta migration, extracting and loading only the data that has changed since the batch run, on the cutover weekend once you have turned the legacy system off. If the target Vault is already live, you can use user access control
Data Transformation and Cleansing
Section link for Data Transformation and CleansingData extracted from the legacy system needs to be transformed before being migrated into Vault. Vault API and Vault Loader accept data in comma-separated values (CSV) format. During this process it's necessary to map data between the legacy system and Vault. Review the data transformation considerations before transforming your data.
Transforming Data References
Section link for Transforming Data ReferencesWhen populating document or object fields which reference object records
Transforming Document Metadata
Section link for Transforming Document MetadataMapping Document Metadata
Section link for Mapping Document MetadataTo understand what document metadata values need to be populated during a migration, review the structure of the Vault Data Model. This can be achieved by running the Vault Configuration Report
Versioned Documents
Section link for Versioned DocumentsVault automatically assigns major and minor document version numbers. The major version starts at one and then increments each time a new steady state is reached. At that time the minor version resets to zero and then increments with each minor change. Some legacy systems allow users to manually assign their own version numbers. Other legacy systems start version numbers at zero instead of one. As a result, the version number from the legacy system may not match those for documents created in Vault.
Document Annotations
Section link for Document AnnotationsTo understand what document annotation metadata values need to be populated during a migration and to create annotations in bulk, see the Create Multiple Annotations endpoint. You cannot create line (line__sys) annotations with Vault API. Following the creation of their parent annotations, you must use the Add Annotation Replies endpoint to create annotation replies (reply__sys). Rather than a CSV, prepare input for these endpoints in the form of a JSON-formatted list of annotation objects.
When migrating document annotations, load annotation types in the following order:
- Anchor (
anchor__sys) - Notes (
note__sys), document link (document_link__sys), external link (external_link__sys), and permalink (permalink_link__sys) annotations in the same API request. - Reply (
reply__sys)
For Vault to Vault migrations, we advise populating annotation external IDs (external_id__sys) in the format {document_version_id}_{annotation_id}. For migrations from external systems, utilize the MD5 checksum of the annotation in order to track data for your integration.
State Mapping
Section link for State MappingLifecycle names and target states must be considered when mapping states. Source documents in “In” states (In Review, In Approval, etc.), other than In Progress, should not be migrated into Vault. Vault will not apply workflows to migrated documents.
Legacy Signature Pages
Section link for Legacy Signature PagesLegacy signature pages must be in PDF format to be migrated into Vault.
Legacy Document Audit Trails
Section link for Legacy Document Audit TrailsMigrating legacy audit trails can significantly impact the time and performance of the migration, depending on the number of documents. The recommended process for migrating legacy audit trails is:
- Create a raw object for the audit trails.
- Enable attachments on the object.
- Create the object records and attach the audit trail.
- Relate the document to the raw object audit trail record.
The audit trail can only log events that take place in Vault. You cannot insert external records into your Vault's audit trail.
Staging Data from an Existing Production Vault
Section link for Staging Data from an Existing Production VaultIf you have an existing production Vault, you must assess which data needs to be staged in sandboxes. This is usually only reference data, but depending on the nature of the migration, you may also need to stage transactional data and files. Without staging, missing references may produce errors during the import of object records and documents.
Transactional data is created as a result of a transaction or represents data that doesn't have a steady state and changes frequently. For example, new documents or object records are considered transactional data. In contrast, reference data is stable and can be governed by change controls that are not the result of a transaction or user event. This type of data is used in object reference fields and in Vault configuration such as entry criteria, user actions, entry actions. Reference data records may sometimes be created as a result of a transaction, in which case you can evaluate whether the project requires regular updates to these records. The reference data may vary between Vault application families and may contain customer-specific reference data as part of a customization.
Loading Data and Documents into Vault
Section link for Loading Data and Documents into VaultDeveloping Migration Tools or Scripts
Section link for Developing Migration Tools or ScriptsWe recommend customers use either Vault Loader or Certified Migration Partners
However, if you develop your own migration tool using the Vault API, consider the following:
Use Loader API or Command Line
Section link for Use Loader API or Command LineVault Loader API endpoints or the Loader command line allow you to automate migration tasks. The Loader service handles processing, batching, error reporting, and is developed and tested by Veeva. Utilizing Vault Loader API endpoints or the Loader command line can greatly reduce the migration time.
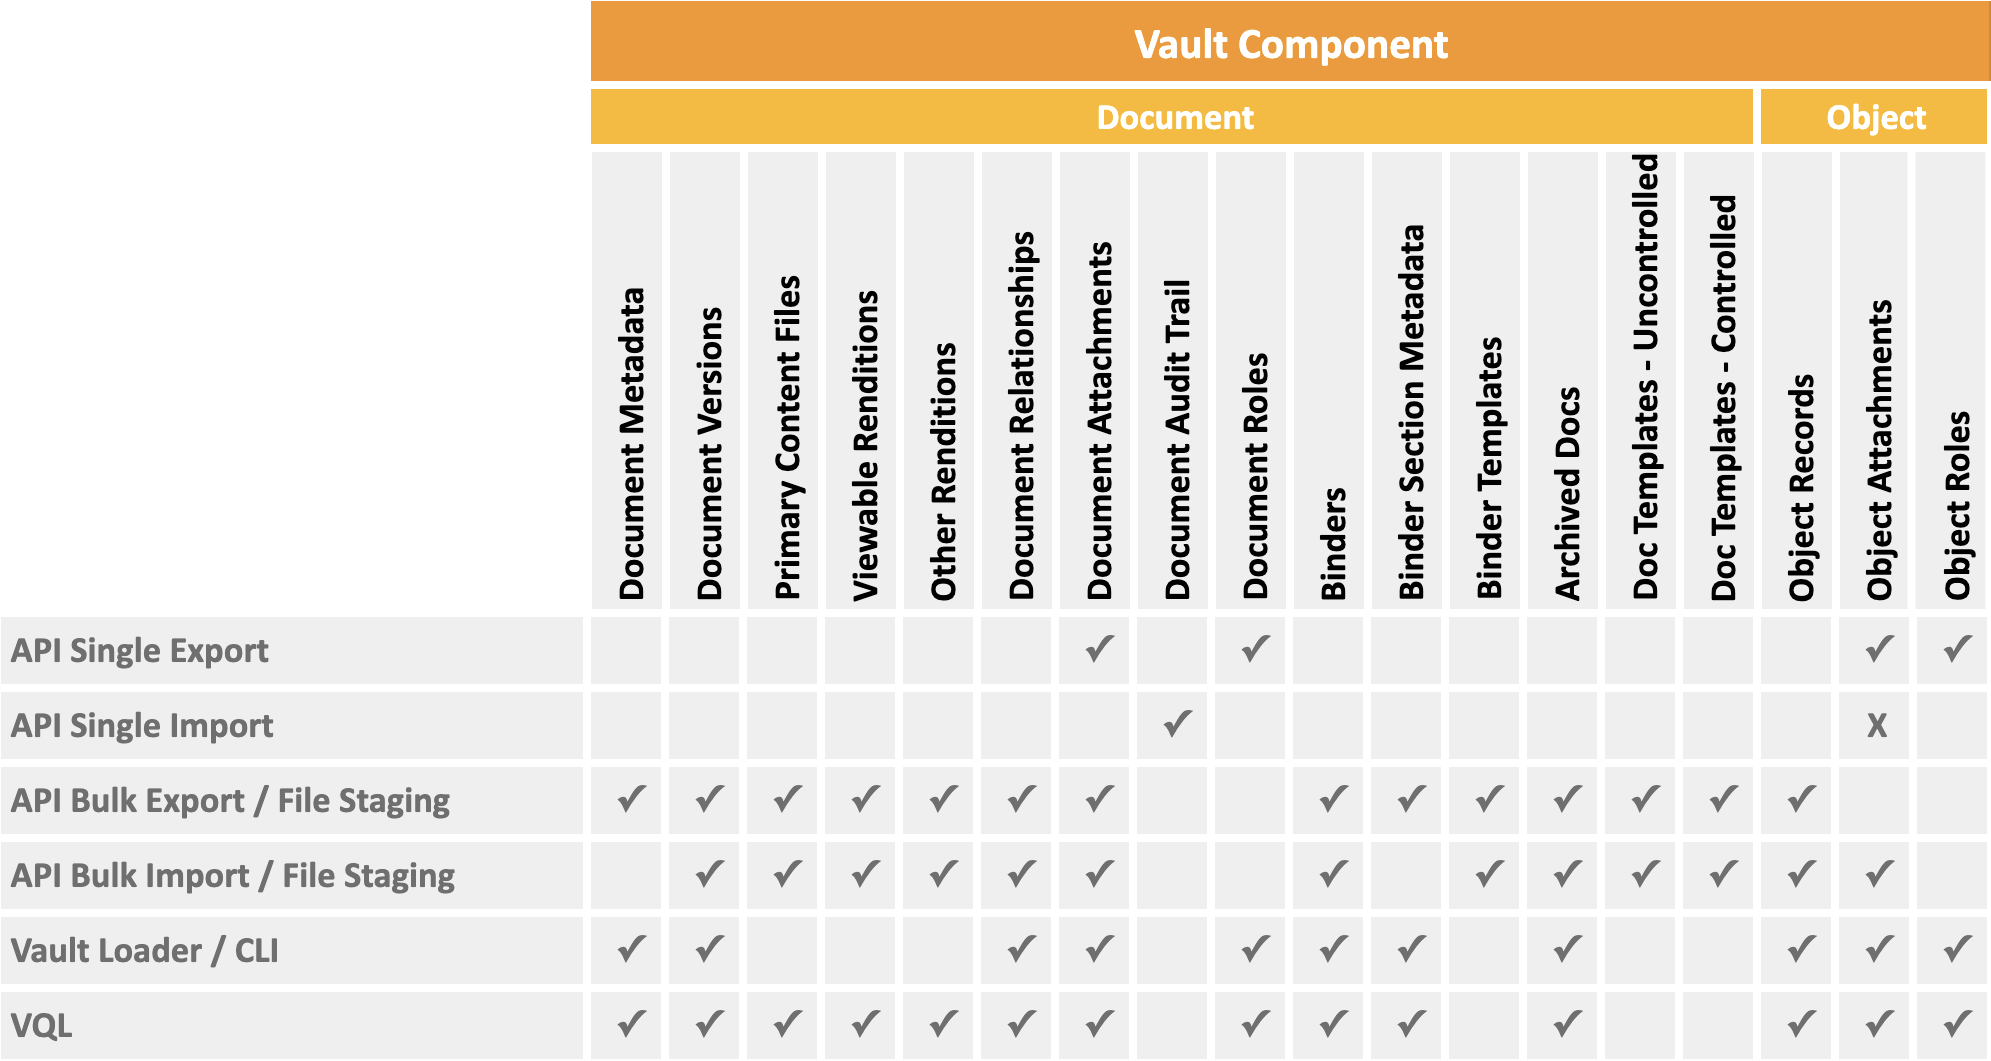
Use Bulk APIs
Section link for Use Bulk APIsMigration should be performed using Bulk APIs for data loading and data verification. Bulk APIs allow you to create a large number of records or documents with a single API call. These APIs are designed for higher data throughput and will minimize the number of calls required. Refer to the table below to see which data types have Bulk APIs.
Set Client ID
Section link for Set Client IDIn any migrations that use Vault API, it’s recommended to set the Client ID. If any errors occur during the migration, Veeva will be better able to assist in troubleshooting.
Handle API Rate Limits
Section link for Handle API Rate LimitsWhen migrating data via Vault API, it’s important to consider API rate limits. If API rate limits are exceeded, integrations will be blocked from using the API. To mitigate exceeding limits, bulk versions of APIs should be used whenever possible. Migration programs should be written in such a way so that the limits are checked for each API call. If the burst or daily limit are within a 10% threshold of breaching, this is handled by either waiting until limits are available or stopping the migration process.
Migration Service Account
Section link for Migration Service AccountConsider creating a user specifically for performing migration activities so it’s clear the data creation and any related activities were done as part of the migration. Any record of a document that is created will clearly show that it was done as part of a migration.
Legacy FTPS Protocols
Section link for Legacy FTPS ProtocolsFTPS should not be used for migrations, as it requires additional configuration, is slower, and puts your solution at risk.
Using FTPS requires additional firewall configuration, which is time-consuming and can be rejected by customer network teams. Vault PODs have a limit on the number of FTPS threads, and your migration can be at risk of being blocked by other legacy FTPS users. By contrast, the Vault API's file staging endpoints support up to 10 threads. Additionally, the API Usage Logs include calls to these endpoints for better traceability and visibility.
Migrating into a Live Vault
Section link for Migrating into a Live VaultConsider the impact on existing users when migrating data into a live Vault.
Scheduling
Section link for SchedulingMigrations can often be a computing-intensive process. For large or complicated migrations, you should schedule migration activities during periods of low user activity such as evenings or weekends.
Configuration Mode
Section link for Configuration ModeWhen enabled, Configuration Mode
User Access Control
Section link for User Access ControlYou can configure user access control
Loading Documents
Section link for Loading DocumentsMigrating documents into Vault can be done using the Create Multiple Documents endpoint. An alternative is to use the Vault Loader Command Line Interface (CLI) or API by following the tutorial for Creating & Downloading Documents in Bulk.
Preload Documents to Staging
Section link for Preload Documents to StagingWhen loading documents into Vault, first upload the files to Vault file staging. This includes the primary source files and document artifacts such as versions, renditions, and attachments. This should be done far in advance, as the upload can take time. After the preloading of the files is completed, you can use Vault Loader
Link File Staging Between Two Vaults
Section link for Link File Staging Between Two VaultsIn order to streamline dry runs, validation testing, and production deployment, we recommend uploading files to a Vault that you do not plan to refresh for the duration of the migration. This Vault is usually the environment where validation activities take place. Vault Owners and System Administrators can use File Staging Linking to link a Vault's file staging to a different Vault. For example, you can use File Staging Linking to link a production Vault to a sandbox Vault. This way, you can refresh the linked Vault without affecting its file staging. Learn more about File Staging Linking
Migration Mode Header
Section link for Migration Mode HeaderDocument Migration Mode
To use this setting, the migration user must have the Vault Owner Actions : Document Migration permission in their security profile’s permission set.
Disable Custom functionality
Section link for Disable Custom functionalityYou should disable custom functionality (such as entry actions
Document Ingestion Delay
Section link for Document Ingestion DelayIt can take time for documents to appear in Vault searches, renditions, or thumbnails once they have been migrated in. For large migrations, document indexing can take several hours. Account for ingestion delay when verifying the existence of migrated documents in Vault.
Suppress Rendition Generation
Section link for Suppress Rendition GenerationIt is common to suppress document rendition generation or provide your own renditions for Vault migrations. If you choose not to suppress renditions, it will take a significant amount of time for Vault to process large quantities of renditions. See the Rendition Status
Binders
Section link for BindersWe do not recommend migrating documents from a legacy system into binders. This operation can be slow and complex to perform. Instead, we recommend reviewing the structure of the documents in the legacy system and utilizing filters on fields to achieve similar functionality in Vault.
Vault Notifications
Section link for Vault NotificationsAfter migrating documents, jobs run that provide notifications to users via email, such as periodic review or expiration. Users for each environment should be forewarned that this may occur. Some users may receive a large number of emails.
Loading Objects
Section link for Loading ObjectsMigrate objects into Vault using the Create Object Records endpoint. An alternative is to use the Vault Loader Command Line Interface (CLI) or API by following the tutorial for Loading Object Records
Record Migration Mode
Section link for Record Migration ModeRecord Migration Mode allows you to migrate object records in non-initial lifecycle states and set custom and system fields, including the record ID. To avoid email flooding during migrations, Vault does not send notifications in Record Migration Mode. Additionally, when using Record Migration Mode, you can set the No Triggers flag to bypass all system, standard, and custom Vault Java SDK triggers. Learn more about Record Migration Mode
When using Record Migration Mode, any additional records created, updated, or deleted within the same transaction inherit most Record Migration Mode behavior. Learn more about Record Migration Mode in Vault Help
Use the Create Object Records, Delete Object Records, or Load Data Objects endpoints to enable this setting using the API.
To use this setting, the migration user must have the Vault Owner Actions : Record Migration permission in their security profile’s permission set.
Disable Record Triggers and Actions
Section link for Disable Record Triggers and ActionsRecord triggers execute custom Vault Java SDK code whenever a data operation on an object occurs. If custom functionality isn’t needed during the migration, disable
Testing Migrations
Section link for Testing MigrationsCreate Development/Sandbox Vault
Section link for Create Development/Sandbox VaultAdminister a sandbox Vault
Reference data, such as picklists and Vault objects are included with the sandbox, but you will need to load other reference data that your migration depends on. Use test data packages
Dry Run Migration
Section link for Dry Run MigrationPerform a dry run migration to test the migration logic, data, and approximate timings. It's not necessary to dry run full data volumes. Logic and timings can be validated using smaller datasets. If the migration fails, correct the issues in the development environment before migrating to the test environment.
Data Verification
Section link for Data VerificationOnce data has been migrated into Vault, verify the data is as expected. This involves a number of different checks, such as:
- Have the expected numbers of documents and transactional objects been migrated to ensure no loss of data? Migration partners may have tools to assist with this.
- Are the fields correctly populated for each of the document and object types? For instance, ensure that field names are correct, transformations were carried out as expected, and reference object lookup fields
are correctly populated. - Use Vault Query Language (VQL) on documents and objects to read Vault data.
- Vault Loader
has an option to Include fields in output log, which automatically returns the created data values resulting from a load.
- Have documents, renditions, and versions migrated correctly? Use VQL to verify renditions, metadata, and checksums.
- Is migrated data in the correct lifecycle state?
- Are the permissions on migrated data correctly set?